 Save
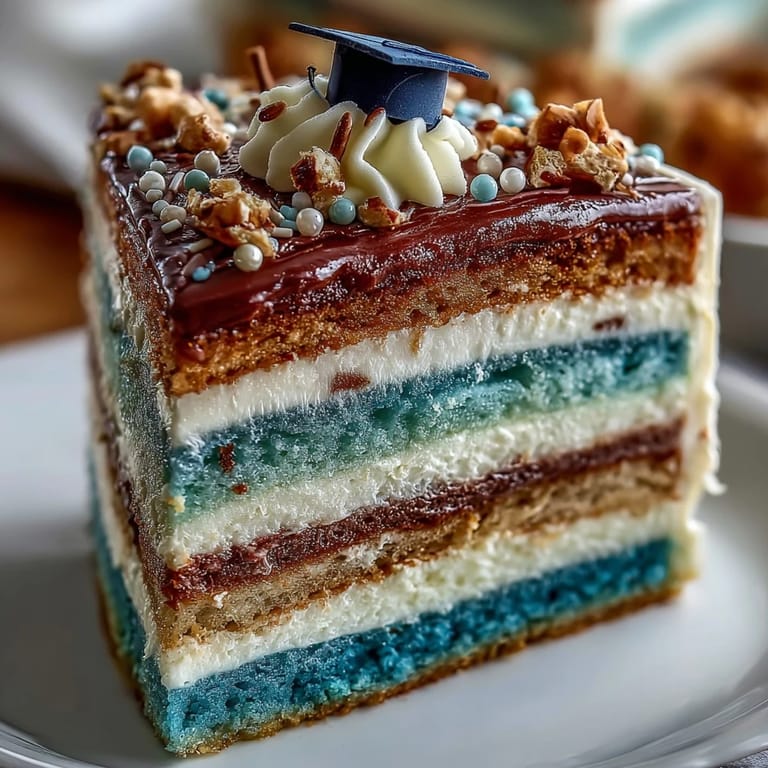
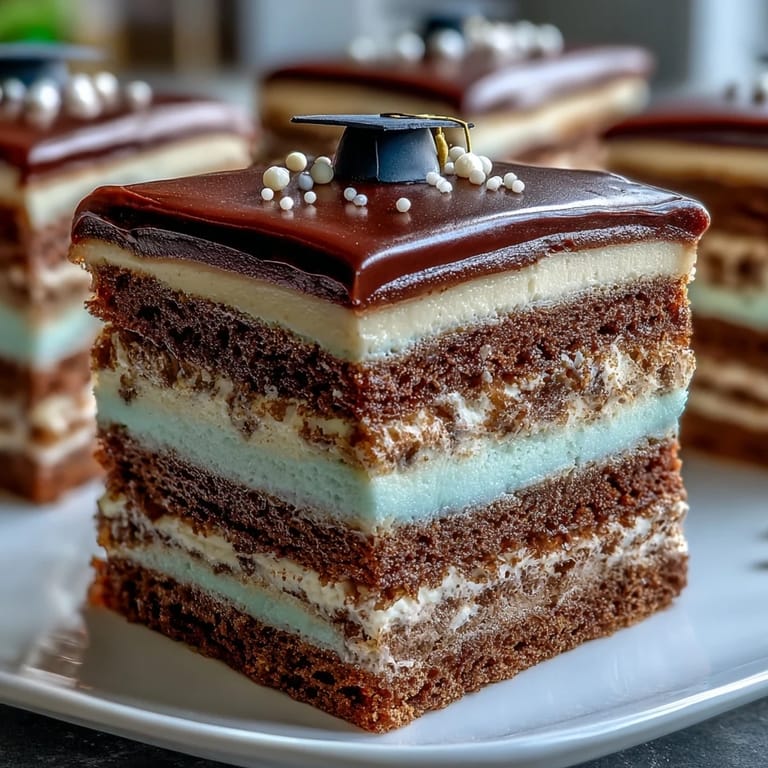
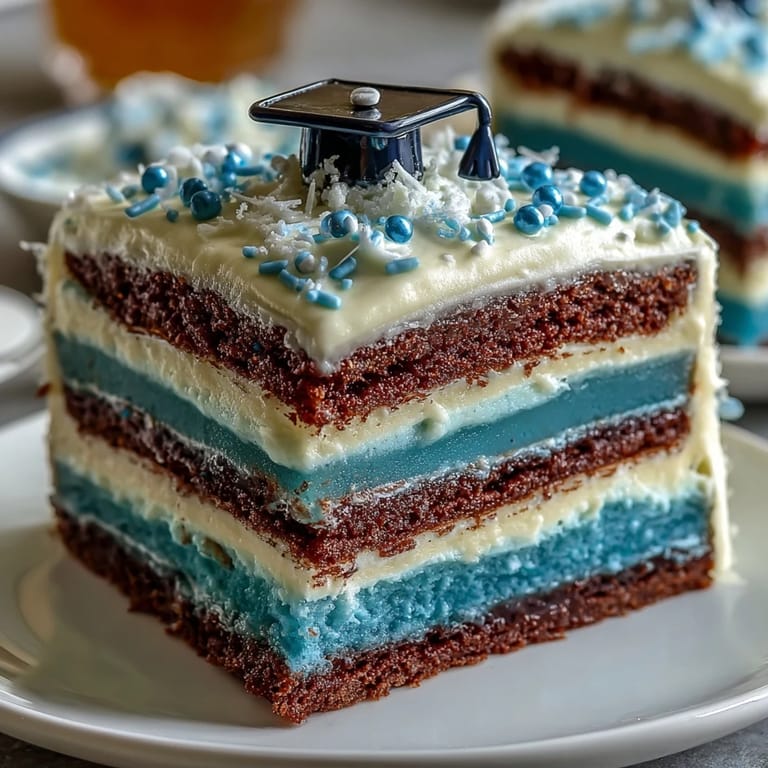
Save My friend texted me three weeks before her graduation asking if I could make her a cake that looked like her school colors blended together. I'd never attempted an ombre cake before, and honestly, the idea of getting four perfectly graduated layers to stack without toppling seemed impossible. But there's something about a milestone moment that makes you want to try the thing you've never done, so I said yes. That Saturday afternoon, watching the batter transform as I added drops of gel coloring to each bowl felt like I was holding something meaningful in my hands—not just cake, but a little ceremony all my own.
The moment I set that four-layer cake on the table at the graduation party, the room actually went quiet. My friend's mom asked where I'd ordered it from, and when I said I'd made it, she teared up a little. That's when I realized this cake had become part of the story of her milestone, something she'd remember every time she looked back at photos. Baking for celebrations changed how I think about cooking altogether after that day.
Ingredients
- All-purpose flour: The foundation that keeps everything tender; make sure it's measured by spooning and leveling, not scooping straight from the bag, which packs it down and throws off your ratios.
- Baking powder: This is what gives you those four pillowy layers that rise evenly and bake at the same speed.
- Unsalted butter: Room temperature is non-negotiable here because cold butter won't cream properly and you'll miss that light, fluffy texture that makes the cake feel special.
- Granulated sugar: The creaming process with butter creates tiny air pockets that keep the cake tender and moist.
- Eggs: Room temperature eggs incorporate more smoothly and give you a better crumb; pull them out of the fridge about thirty minutes before you start.
- Vanilla extract: Don't skip this or use imitation; real vanilla makes a noticeable difference in how refined the flavor tastes.
- Whole milk: Room temperature milk prevents the batter from seizing up when it hits the warm butter mixture.
- Gel food coloring: Gel is thicker and more concentrated than liquid, so your colors stay vibrant without making the batter too wet and changing the cake's texture.
- Egg whites and sugar for buttercream: The Swiss meringue method heats these together, which means you get a stable, silky frosting that doesn't taste eggy or grainy.
Tired of Takeout? 🥡
Get 10 meals you can make faster than delivery arrives. Seriously.
One email. No spam. Unsubscribe anytime.
Instructions
- Preheat and prepare your pans:
- Get your oven to 350°F and line four 8-inch pans with parchment paper, making sure the paper comes up the sides so your layers release cleanly. This step takes two minutes but saves you from sticking disasters later.
- Mix your dry ingredients:
- Whisk flour, baking powder, and salt together in a medium bowl to distribute the leavening evenly. This simple step prevents dense pockets from forming in your finished cake.
- Cream butter and sugar:
- Beat them together for about three minutes until the mixture looks pale and fluffy, like soft clouds. You're incorporating air into the mixture, which is what makes this cake light.
- Add eggs one at a time:
- Drop each egg in, beat well, then add the next one; this prevents the batter from looking curdled and separated. If it does separate a bit, a touch of flour mixture will bring it back together.
- Alternate wet and dry:
- Start with flour, add milk, then flour again, ending with flour so everything stays emulsified and smooth. Mix just until combined—overbeating develops gluten and toughens your cake.
- Create your ombre batter:
- Divide the batter evenly into four bowls and add increasing amounts of gel coloring to each one, starting with the lightest shade. The gel coloring is thick, so you only need a tiny bit per bowl—less than you'd think.
- Bake with patience:
- Divide batter among pans, smooth the tops gently, and bake for 22-25 minutes until a toothpick comes out clean. Don't open the oven door before minute 20 or you risk them collapsing.
- Cool properly:
- Let cakes rest in pans for exactly ten minutes so they set just enough to release cleanly, then turn out onto racks to cool completely. Rushing this step can cause them to crumble.
- Make your Swiss meringue:
- Whisk egg whites and sugar over simmering water, stirring constantly, until the sugar dissolves and the mixture reaches 160°F. This heats the eggs to food-safe temperature while you build volume.
- Whip until cool and silky:
- Transfer to your mixer and whip on high for about ten minutes until stiff peaks form and the mixture cools completely. This transforms it from a glossy foam into the foundation of luxurious frosting.
- Add butter gradually:
- Once cool, add softened butter a few cubes at a time, beating well between additions so it incorporates smoothly. If your buttercream looks broken or greasy, it's usually because the meringue wasn't cool enough when you started adding butter.
- Color your frosting:
- Divide the buttercream and tint portions to match your cake layers if you want a coordinated look, or keep it white for simplicity. A tiny dab of gel color goes a long way.
- Layer with intention:
- Start with your darkest cake layer on the stand, spread frosting on top, then layer the next shade, continuing until the lightest is on top. The gradient now moves from dark at the bottom to light at the top for maximum visual impact.
- Apply the crumb coat:
- Spread a thin layer of frosting over the entire cake to seal in crumbs, then chill for twenty minutes. This prevents crumbs from getting into your final frosting layer.
- Frost the final layer:
- Apply your final frosting generously, using an offset spatula to blend and swirl if you want an ombre effect on the sides. This is where the cake transforms into something truly show-stopping.
- Decorate and chill:
- Add your toppers, pearls, or piped details once the frosting is set, then chill the finished cake until it's firm. Bring to room temperature for thirty minutes before serving so the flavors and texture shine.
 Save
Save Three years later, my friend still has the photo of her holding that cake, laughing in her graduation gown. She's told me countless times that it was the most memorable part of her party for her, which sounds like a small thing until you realize that food memories stick around longer than almost anything else. Making that cake taught me that celebration cakes aren't just about technique—they're about showing up for someone's moment.
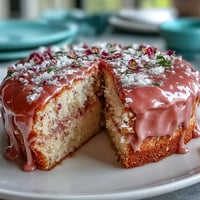
Why Ombre Matters More Than You Think
An ombre cake catches light differently at every angle because of the color graduation, which means it photographs beautifully from any direction. The depth of color also creates an illusion of sophistication that would take hours of piping to achieve if you were frosting it on manually. When people see a perfectly graduated ombre cake, they assume you spent the entire day on it, but really you just tinted some batter.
The Swiss Meringue Secret
Swiss meringue buttercream tastes completely different from American buttercream—silkier, less sweet, and almost mousse-like on your tongue. The key is heating the egg whites to 160°F, which sounds intimidating but just means stirring them over a pot of simmering water for about two minutes. Once you've made it once and tasted the difference, you'll understand why it's worth the extra step.
Troubleshooting Your Celebration
If one of your cake layers comes out slightly domed on top, use a serrated knife or cake leveler to trim it flat so the layers stack evenly and your ombre effect stays clean and visible. A cake that leans is a cake that catches eyes for all the wrong reasons, but a crooked cake is also usually salvageable with frosting and careful stacking.
- If your buttercream breaks while you're adding butter, warm it gently over hot water for just a few seconds and whip it again until it comes together.
- Don't assemble the cake more than four hours before serving or the layers start absorbing frosting and can shift slightly.
- If you need to make this a day ahead, bake the layers, wrap them undecorated, and frost the next day when everything is completely cool and stable.
 Save
Save This cake has a way of becoming part of someone's story, which is exactly what celebration desserts should do. Make it with attention and love, and you'll create a memory that tastes as beautiful as it looks.
Recipe FAQ
- → How is the ombre effect achieved in the cake layers?
The batter is divided into four portions, each tinted with increasing amounts of gel food coloring to create a smooth gradient from light to dark.
- → What is Swiss Meringue Buttercream and why use it?
Swiss Meringue Buttercream is made by gently heating egg whites and sugar, then whipping until stiff peaks form, followed by adding butter. It yields a silky, stable frosting ideal for smooth finishes and delicate coloring.
- → Can the cake layers be flavored differently?
Yes, while the base is vanilla, you can add cocoa powder to create a chocolate ombre or incorporate other flavor extracts to customize each layer.
- → What tools are essential for making this layered cake?
You'll need multiple cake pans for uniform layers, a mixer for the batter and buttercream, piping bags for decoration, and wire racks for cooling.
- → How can I enhance the cake's appearance when serving?
Adding edible gold or silver pearls, themed toppers, and piping decorative details provides a polished, celebratory presentation.