 Save
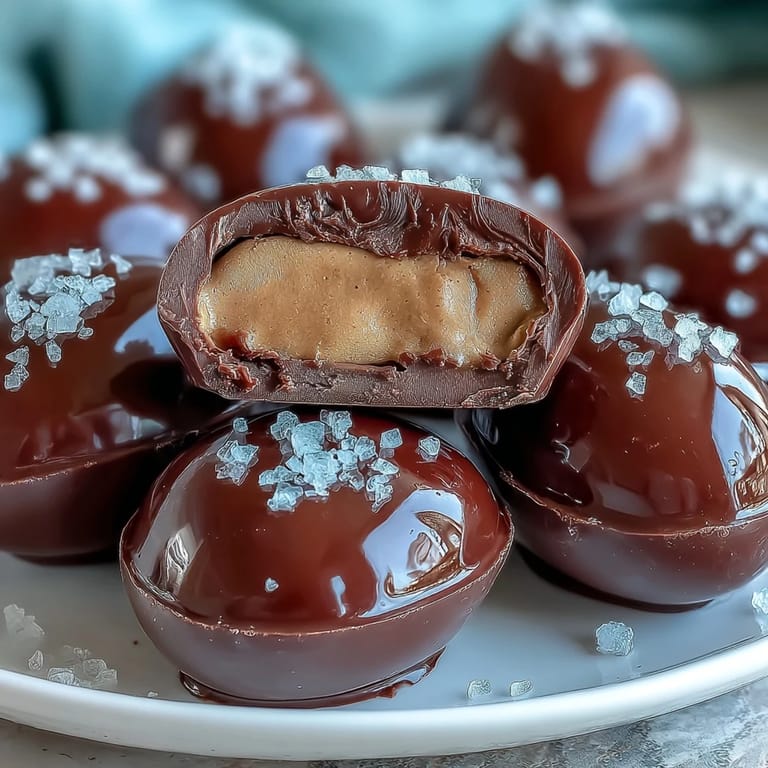
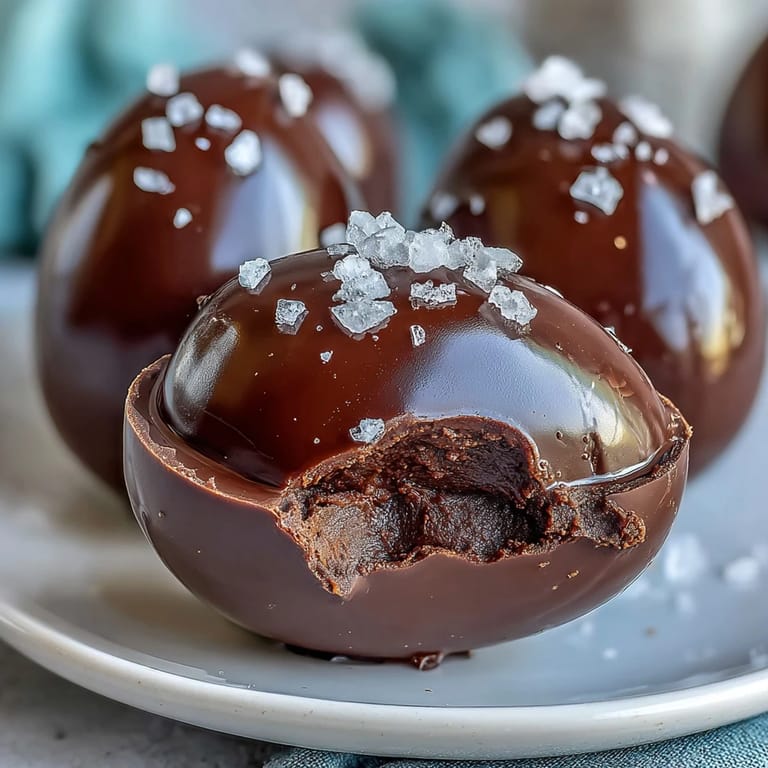
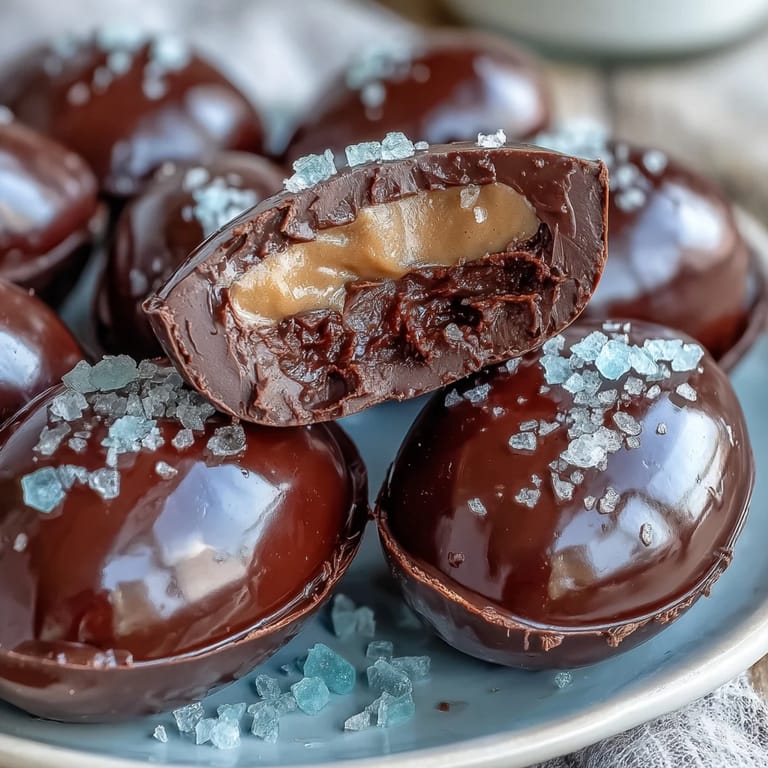
Save The aroma of melted chocolate always brings to mind the playful chaos that filled my kitchen last spring. These Dark Chocolate Peanut Butter Easter Eggs became my go-to when I wanted something special without spending hours. As the chocolate glossed over each peanut butter oval, it was impossible not to sneak a taste. I remember how the flaky sea salt shimmered on top, promising that salty-sweet bite. It was one of those rare moments where homemade treats actually looked as good as they tasted.
One Easter morning, I made a batch for my friends, and the conversation quickly shifted to who could make the perfect egg shape. Someone dropped a finished egg on the counter, but nobody minded — it just made the whole kitchen laugh louder. They disappeared faster than I expected, and even the adults couldn&apost stop reaching for seconds. It felt like dessert brought just as much joy as the holiday itself.
Ingredients
- Creamy peanut butter: Smooth peanut butter gives the centers a velvety texture; I&apost learned that using room temp peanut butter makes mixing much easier.
- Unsalted butter: Softening the butter ahead of time prevents little lumps and helps the filling hold together.
- Powdered sugar: This blends quickly and ensures no graininess in the filling, plus it&apost what gives structure.
- Vanilla extract: Just half a teaspoon upgrades the flavor from simple to deliciously aromatic.
- Fine sea salt: A pinch here is subtle, but it intensifies the peanut butter taste beautifully.
- Dark chocolate (60–70% cocoa): I&aposve found that quality chocolate melts smoother and makes the coating glossy.
- Coconut oil (optional): If you want a gentler shell and shinier finish, a little coconut oil is magic, but you can skip it for a thicker crust.
- Flaky sea salt: Don&apost wait too long to sprinkle this — it must be added before the chocolate sets so it sticks just right.
Tired of Takeout? 🥡
Get 10 meals you can make faster than delivery arrives. Seriously.
One email. No spam. Unsubscribe anytime.
Instructions
- Prep Your Baking Sheet:
- Grab parchment paper and line your sheet, so nothing sticks and cleanup will be a breeze.
- Make the Filling:
- Combine peanut butter, softened butter, powdered sugar, vanilla, and salt in a mixing bowl. Beat together until it&apost thick, creamy, and a bit sticky.
- Shape Your Eggs:
- Scoop out about two tablespoons for each egg, then gently roll and shape into ovals with your hands. Place them spaced out on the parchment as you go.
- Freeze the Eggs:
- Move the tray into the freezer for half an hour; watch how firm they become, which makes dipping effortless.
- Melt the Chocolate:
- Set up a double boiler or microwave the chocolate and coconut oil in short bursts, stirring until glossy and smooth.
- Dip the Eggs:
- Using a fork, lower each frozen egg into the melted chocolate, letting the extra drip away. Set them back on the baking sheet for easy finishing.
- Add Flaky Salt:
- Quickly sprinkle flaky sea salt on top while the chocolate is still wet so every egg gets that gourmet touch.
- Chill to Set:
- Refrigerate your eggs for fifteen minutes — the chocolate will harden and shine. Serve them cold, or let them warm up to room temp for a softer bite.
 Save
Save After sharing these eggs at a little outdoor picnic, someone told me they reminded them of childhood treats but tasted so much better. The laughter as we traded best-and-worst shaping attempts made the day feel complete — it became a memory about connection, not just food.
Chocolate Dipping Made Easy
I used to panic about melted chocolate seizing up, but working slowly and stirring often kept everything smooth. If your kitchen runs warm, melt in shorter stints to keep control. The fork method is great for letting extra chocolate fall away, which means thinner, more delicate shells.
Egg Shaping Tips for Beginners
Don&apost stress about getting every shape perfect — the homemade look is half the charm. If your mixture sticks to your palms, rub a little butter on your hands. Kids love making lumpy eggs, and honestly, the funny shapes end up just as delicious.
Storing and Serving for Maximum Freshness
Store leftovers in a lidded container and refrigerate so the chocolate stays firm and filling stays creamy. Letting eggs sit out for ten minutes before serving softens the peanut butter for an even better texture.
- Freeze extras for treats on another day.
- Label your container if making more than one batch.
- Always check chocolate packaging for allergy info.
 Save
Save These peanut butter eggs turn any regular day special. You&aposll find that the moments spent shaping, dipping, and sharing are just as sweet as the taste itself.
Recipe FAQ
- → Can crunchy peanut butter be used?
Yes, using crunchy peanut butter creates extra texture in the center and adds a pleasant crunch to each bite.
- → How do I achieve a smooth chocolate coating?
Adding coconut oil to melted chocolate can help smooth and thin the coating for effortless dipping and a glossy finish.
- → How should these treats be stored?
Keep them in an airtight container in the fridge for up to a week or freeze for up to two months to maintain freshness.
- → Are these suitable for gluten-free diets?
Yes, if all ingredients are certified gluten-free, including chocolate and powdered sugar, these treats suit gluten-free diets.
- → Can vegetable oil replace coconut oil?
Yes, vegetable oil can be used in place of coconut oil or omitted entirely for a thicker chocolate shell.
- → What tools are needed to make them?
You’ll need a mixing bowl, hand mixer or sturdy spoon, baking sheet, parchment paper, fork, and microwave or double boiler.